
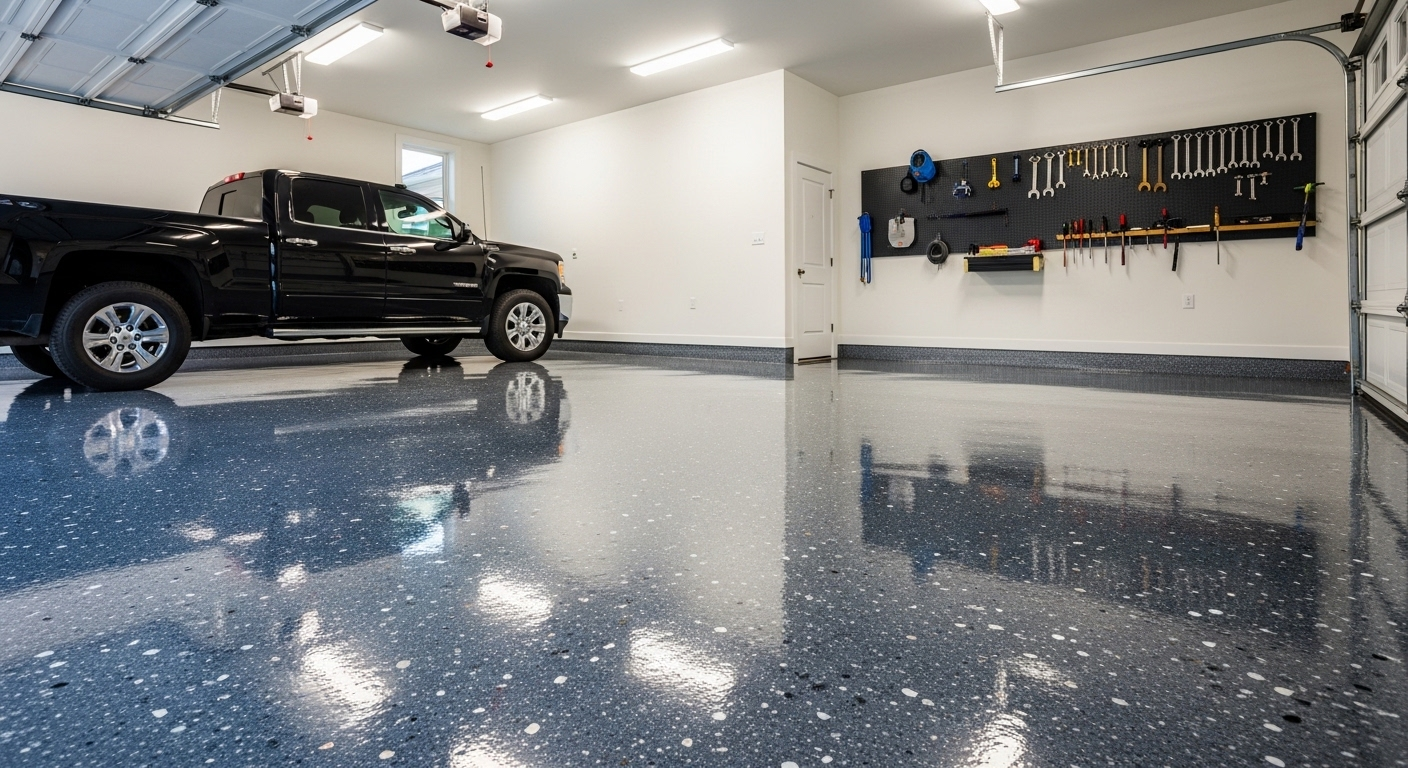
Did you know that most epoxy coatings fail not because of a bad product, but because of skipped preparation? If you want a finish that holds for 15 to 20 years, you need to prepare garage floor for epoxy after winter before a single drop of coating touches your concrete.
Winter is one of the harshest seasons for concrete garage slabs. Freeze-thaw cycles, road salt, snowmelt, and temperature extremes cause cracks, spalling, moisture saturation, and surface contamination that will destroy any epoxy bond. The decision to prepare garage floor for epoxy after winter is not optional — it is the single most important factor in whether your coating lasts or fails.
In this complete guide, the team at Rio Epoxy Flooring walks you through every proven step to prepare garage floor for epoxy after winter , from the first inspection to final surface readiness. Whether you are a hands-on homeowner in Austin or looking to hire the right crew, this guide gives you the full picture.
Ready to skip the hard part? Request a free quote from Rio Epoxy Flooring today.
Why You Need to Prepare Garage Floor for Epoxy After Winter
The most important reason to prepare garage floor for epoxy after winter is simple: epoxy bonds to concrete, not to contamination, moisture, or damaged surface material. Every winter leaves behind a layer of problems that must be corrected before any coating is applied.
Concrete is porous. During winter, water penetrates its pores, freezes, expands, and fractures the surface from the inside out. Road salt and deicing chemicals react with calcium compounds in the slab, causing surface spalling — thin layers of concrete flaking off the top. If you do not prepare garage floor for epoxy after winter before coating, these underlying problems will push the epoxy up and off the surface within weeks.
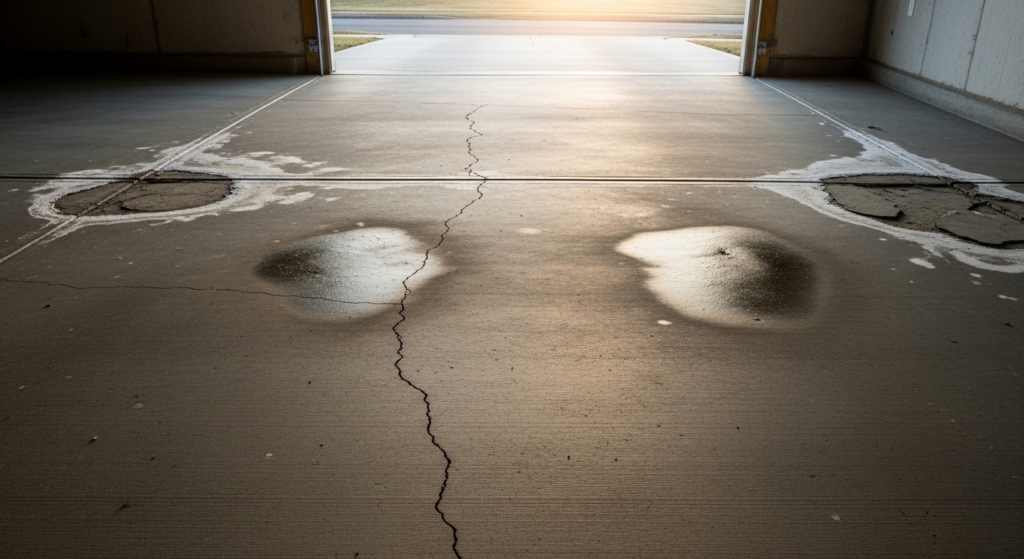
The Most Common Winter Damage to Identify
- Hairline cracks caused by freeze-thaw pressure cycling
- Surface spalling from salt and chemical deicer reactions
- Moisture saturation deep in the slab from months of snowmelt
- Oil and grease contamination from winter vehicle maintenance
- Efflorescence — white chalky mineral deposits along floor edges and walls
Each of these issues must be fully resolved when you prepare garage floor for epoxy after winter or the coating will not perform as expected.
“Rio Epoxy did an amazing job on our garage floor. The prep work alone showed me they knew what they were doing. The floor looks incredible and it’s been holding up perfectly for over a year.” — Marcus T., Austin, TX
How to Prepare Garage Floor for Epoxy After Winter: 7 Proven Steps
The following is the exact sequence used by Rio Epoxy Flooring on every project in the Austin, TX area. Follow each step completely when you prepare garage floor for epoxy after winter and you set yourself up for a result that will outlast the alternatives by a decade or more.
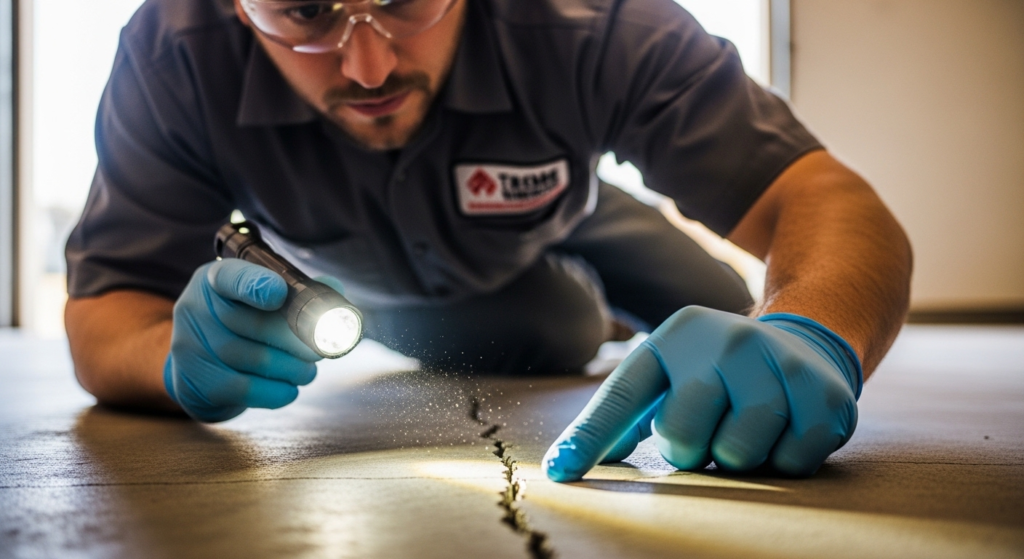
Step 1: Inspect the Slab for Winter Damage
The first thing to do when you prepare garage floor for epoxy after winter is a detailed visual and tactile inspection of the entire slab. Get low with a flashlight and look for:
- Cracks wider than 1/8 inch — a structural concern requiring injection repair
- Soft, crumbling, or flaking surface zones indicating active spalling
- Discolored patches showing past moisture intrusion
- White mineral deposits along walls, baseboards, or floor edges
Run your palm across the surface. If concrete dust transfers to your hand, the top layer is deteriorated and must be mechanically ground before coating. Document all damage areas with photos — this is especially helpful when working with a contractor like Rio Epoxy Flooring to get an accurate assessment.
PAA:“How do I know if my garage floor is too damaged for epoxy?”
Step 2: Deep Clean and Degrease the Entire Floor
Cleaning is where many DIY projects fall short. A basic rinse is never enough when you prepare garage floor for epoxy after winter . Follow this multi-stage process:
- Sweep and HEPA-vacuum all loose particles, dirt, and concrete dust
- Apply commercial concrete degreaser (ZEP Heavy-Duty or equivalent) to all stained zones
- Scrub aggressively with a stiff-bristle brush, focusing on tire-track and salt areas
- Pressure wash at a minimum of 3,000 PSI to flush all residue
- Allow 24–48 hours of drying time before proceeding
For heavy salt staining left by winter deicers, a diluted muriatic acid solution (1 part acid to 10 parts water) will both neutralize residue and start the surface etching needed for adhesion. Learn more about how deep cleaning fits into the full residential epoxy flooring process at Rio Epoxy Flooring.
Step 3: Repair All Cracks, Chips, and Spalled Areas
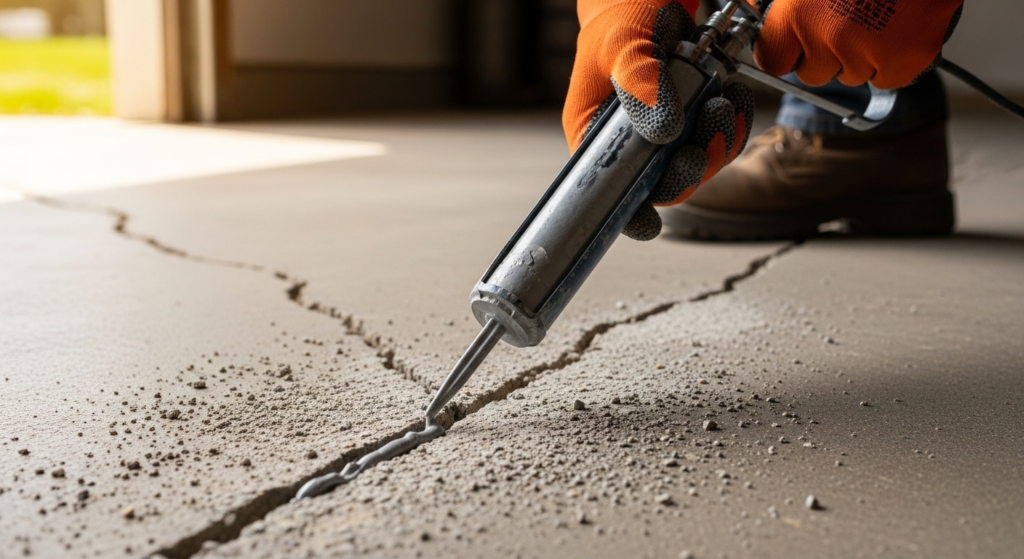
Unrepaired damage will cause any epoxy system to fail. Every void must be addressed when you prepare garage floor for epoxy after winter :
- Hairline cracks under 1/8″: Fill with a flexible polyurea crack filler
- Wider cracks over 1/8″: Use a two-part epoxy crack injection system
- Spalled surface areas: Apply cementitious or epoxy repair mortar, feathered flush to surrounding surface
- Pitting and divots: Use a skim coat of concrete patching compound
Allow all repairs to cure for a minimum of 24 hours. Rushing past this stage is the most common mistake homeowners make when they prepare garage floor for epoxy after winter on a compressed weekend schedule.
PAA: “Can you apply epoxy over cracked concrete?”
Step 4: Test for Moisture — Never Skip This Step
Moisture is the invisible cause of most epoxy failures. Even when a slab looks dry, significant vapor can be pushing up from below — especially in spring, when soil and concrete temperature differentials drive vapor transmission upward. This is one of the most critical checks when you prepare garage floor for epoxy after winter .
Two reliable moisture tests:
- Plastic sheet test: Tape a 16″×16″ plastic sheet to the floor, seal all four edges, wait 24 hours. Condensation under the plastic means active vapor transmission.
- Calcium chloride test kit: Measures moisture emission rate in lbs/1,000 sq ft/24 hours. Standard epoxy requires a reading below 3 lbs.
| Moisture Level | Recommended Action |
|---|---|
| Under 3 lbs/1,000 sq ft | Proceed with standard epoxy primer |
| 3–7 lbs/1,000 sq ft | Apply moisture-mitigating epoxy primer |
| Over 7 lbs/1,000 sq ft | Consult a professional before proceeding |
The team at Rio Epoxy Flooring conducts professional-grade moisture testing on every job. It is a step that consistently separates long-lasting results from early failures. Visit our FAQ page for more detail on moisture testing standards.
Step 5: Mechanically Grind or Acid-Etch the Surface
Creating the correct surface profile is essential when you prepare garage floor for epoxy after winter . Epoxy needs an open-pore, slightly rough surface to bond correctly — a smooth trowel finish will cause delamination regardless of coating brand or price.
Option A — Diamond Grinding (Recommended)
A walk-behind diamond grinder opens concrete pores mechanically without chemicals, producing a consistent CSP 2–3 surface profile. This is the method Rio Epoxy Flooring uses on every installation in Austin, TX.
Option B — Acid Etching
A diluted muriatic or phosphoric acid solution etches the surface chemically. More accessible for DIYers but less consistent than grinding. Full rinsing and pH neutralization are required after application.
Skipping surface profiling is the leading reason homeowners who prepare garage floor for epoxy after winter still end up with a coating that peels before the next season.
PAA: “Is acid etching enough to prep concrete for epoxy?”
Step 6: Final Vacuum, Rinse, and Drying Period
After grinding or etching, concrete dust, fine particles, and chemical residue must be completely removed before the coating phase. Use an industrial HEPA vacuum, do a final rinse, and allow 24–48 hours of drying time. This is the last preparation checkpoint when you prepare garage floor for epoxy after winter .
Check environmental conditions before scheduling your epoxy application:
- Air temperature: 55°F–90°F
- Concrete surface temperature: At least 5°F above the dew point
- Relative humidity: Below 85%
Spring in Austin offers the best combination of temperature and humidity in the entire year. Mid-March through April is the ideal window to prepare garage floor for epoxy after winter and apply a coating that cures correctly from the first layer.
Want a professional to handle every step? Contact Rio Epoxy Flooring — Mon–Sat, 8am–5pm. Call (737) 307-1888 or email contact@rioepoxyflooring.com.
Step 7: Choose the Right Epoxy System

Once every prior step is complete, the final decision when you prepare garage floor for epoxy after winter is which coating system to use:
| Epoxy Type | Durability | Best For | Avg. Cost/Sq Ft |
|---|---|---|---|
| Water-based epoxy | Moderate | Light residential use | $2–$4 |
| Solvent-based epoxy | High | Heavy residential / light commercial | $4–$7 |
| 100% solid epoxy | Highest | Professional / commercial installs | $7–$12 |
| Polyaspartic topcoat | Excellent UV resistance | Topcoat over epoxy base | $3–$6 |
For Austin homeowners, Rio Epoxy Flooring recommends a 100% solids epoxy base with a polyaspartic topcoat — a system that resists Texas heat, UV yellowing, tire marks, and chemical spills far better than any box-store product. Check out our financing options to make professional installation accessible, or explore commercial epoxy flooring services in Austin if your project goes beyond the residential garage.
“I had another company do my garage floor two years ago and it started peeling after one winter. Rio Epoxy came in, reprepped everything properly, and the new floor looks brand new. Should have called them first.” — Jennifer R., Round Rock, TX (Yelp Review)
Real Case Study: Georgetown Homeowner Avoids a Costly Mistake
A homeowner near Georgetown, TX contacted Rio Epoxy Flooring in early March after a failed DIY epoxy application. She had applied a big-box kit without running a moisture test or profiling the surface. Within three weeks, 40% of the coating had bubbled and peeled.
Rio Epoxy’s crew discovered a moisture emission rate of 5.2 lbs — well above the safe threshold for standard epoxy. They applied a moisture-mitigating primer and installed a full 100% solids epoxy system with decorative flake broadcast. The floor has since survived two Austin summers and another Texas winter with zero delamination.
Her mistake was clear: she did not prepare garage floor for epoxy after winter before starting the project. The lesson applies to every homeowner across the areas Rio Epoxy serves — from Round Rock and Leander to Killeen, Lakeway, Dripping Springs, and Temple.
Common Mistakes When You Prepare Garage Floor for Epoxy After Winter
Knowing what to avoid is just as important as knowing what to do. These are the most frequent errors made when homeowners prepare garage floor for epoxy after winter :
- Applying epoxy too soon after cleaning — concrete must be fully dry (24–48 hours minimum)
- Skipping the moisture test — invisible vapor causes bubbling and delamination
- Using a box-store water-based kit on high-moisture or damaged concrete — these products need near-perfect conditions
- Not repairing cracks before etching — acid widens hairline fractures
- Applying epoxy below 55°F — the coating will not cure and will stay tacky
- Applying without a primer coat — primer penetrates deep into concrete pores for a lasting bond
- Skipping surface profile — the top reason professional coatings outlast DIY results by 10+ years
Every contractor who knows how to prepare garage floor for epoxy after winter will confirm that most DIY failures trace back directly to one of these seven errors. Visit our FAQ page for detailed answers to the most common questions about this process.
Tools and Materials You Will Need
For DIY surface preparation:
- Concrete degreaser (ZEP Heavy-Duty or equivalent)
- Pressure washer (minimum 3,000 PSI)
- Diamond floor grinder rental or walk-behind grinder
- Polyurea crack filler and two-part epoxy injection kit
- Calcium chloride moisture test kit
- Industrial HEPA-filter shop vacuum
- Stiff-bristle scrub brush
- Muriatic acid (for etching when grinding is not available)
- Safety glasses, chemical-resistant gloves, N95 respirator
External authority resources:
- This Old House — Epoxy Garage Floor Guide (external authority link)
- Concrete Network — Surface Preparation Standards (external authority link)
- Lowe’s Step-by-Step Epoxy Floor Guide (external reference)
FAQ — Frequently Asked Questions
Q1: When is the right time to prepare garage floor for epoxy after winter?
The right time to prepare garage floor for epoxy after winter is when nighttime temperatures stay consistently above 50°F and the slab has had time to dry out from winter moisture. In Austin, TX, mid-March through April is the ideal window.
Q2: Can I apply epoxy over an old coating or previous epoxy layer?
No. Old coatings must be fully removed by diamond grinding before applying new epoxy. Applying over existing material without correct surface preparation will cause the new coating to delaminate — especially after temperature fluctuations like those following winter.
Q3: What happens if I skip the moisture test when I prepare garage floor for epoxy after winter?
If you prepare garage floor for epoxy after winter and skip the moisture test, you risk applying epoxy over a slab with active vapor transmission. That moisture will push up through the coating, causing bubbles, blisters, and delamination within days or weeks. Schedule a free moisture assessment with Rio Epoxy Flooring here.
Q4: What temperature is best when I prepare garage floor for epoxy after winter?
The best time to prepare garage floor for epoxy after winter is when air temperature is between 55°F and 85°F and the concrete surface is at least 5°F above the dew point. Applying in colder conditions prevents proper curing.
Q5: How long does a properly prepared epoxy floor last?
A professionally installed 100% solids epoxy system over a correctly prepared slab typically lasts 15 to 20 years with basic maintenance. DIY water-based kits applied without proper prep rarely last more than two years. See Rio Epoxy’s financing options to make professional results accessible.
Conclusion
Spring is the single best time of year to prepare garage floor for epoxy after winter , and now you have the complete, step-by-step roadmap to do it right. From identifying freeze-thaw damage in Step 1, to selecting the correct epoxy system in Step 7, every stage of this guide reflects the same process that has made Rio Epoxy Flooring one of the most trusted flooring teams in Austin, TX.
The cost of skipping preparation is always higher than the cost of doing it correctly the first time. Every homeowner who takes the time to prepare garage floor for epoxy after winter using this process ends up with a surface that handles Texas heat, chemical spills, heavy vehicles, and the next winter cycle without flinching.
If you are located in Austin or the surrounding area — including West Lake Hills, Rollingwood, Barton Creek, Sunset Valley, or Lost Creek — let Rio Epoxy Flooring handle every step for you.
The best decision you can make this spring is to properly prepare garage floor for epoxy after winter before the summer heat arrives. Contact Rio Epoxy Flooring for a free, no-obligation quote. Call (737) 307-1888, email contact@rioepoxyflooring.com, or fill out our contact form here. Mon–Sat, 8am–5pm.
Find us on Google Maps | Read our Yelp Reviews | Watch our work on YouTube | Connect on LinkedIn
Rio Epoxy Flooring
823 Congress Ave. Austin, TX 78701
Phone: (737) 307-1888
Email: contact@rioepoxyflooring.com
Hours: Mon–Sat: 8am–5pm
View all areas served