

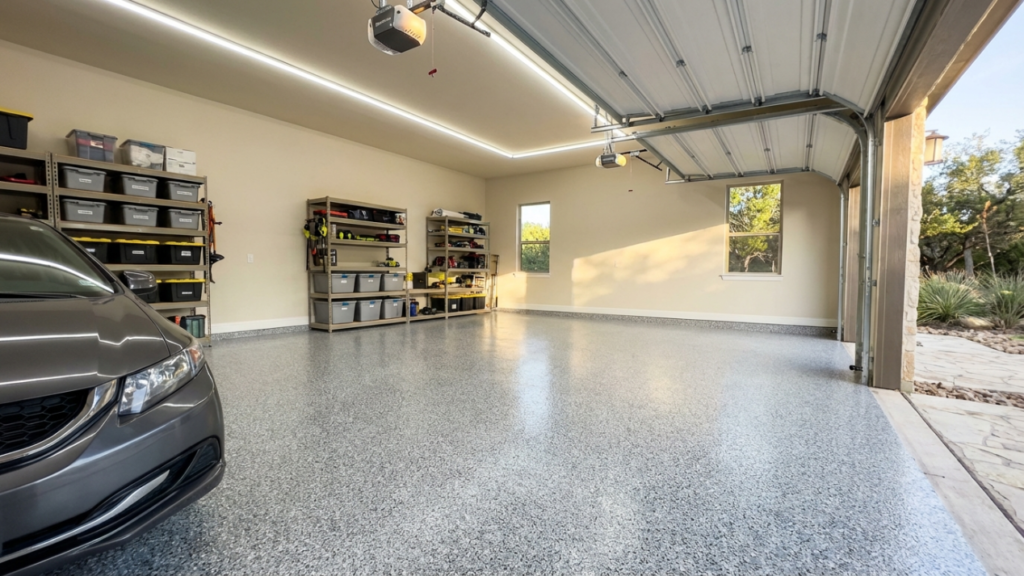
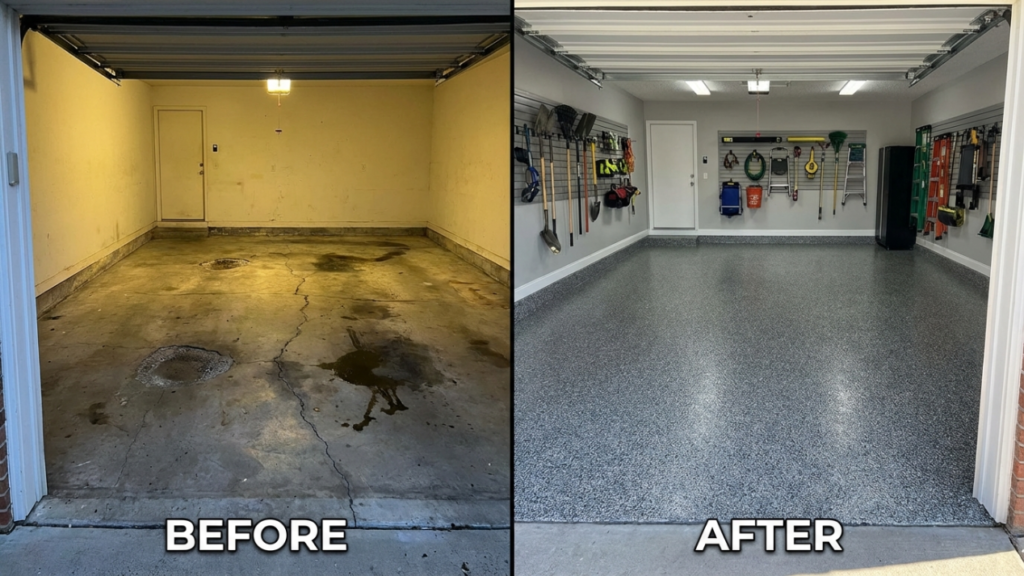
Is your garage floor covered in oil stains, cracks, and years of neglect? If so, you are not alone — and the solution is simpler, more affordable, and more impressive than most homeowners expect. Epoxy garage floor coating is the single most effective upgrade you can make to your garage, transforming a rough, stained concrete slab into a clean, durable, and visually stunning surface that holds up for decades.
In this complete guide, you will learn exactly what epoxy garage floor coating is, which types are available, what the real costs look like, how the installation process works step by step, and what mistakes to avoid. You will also find real customer stories from Austin homeowners and expert advice from the team at Rio Epoxy Flooring.
Keep reading to discover everything you need to make a confident, informed decision about your garage floor.
Ready to stop looking at that ugly garage floor? Request your free quote from Rio Epoxy Flooring and get a professional assessment at no cost. Call (737) 307-1888 — Mon–Sat, 8am–5pm.
What Is Epoxy Garage Floor Coating?
Epoxy garage floor coating is a two-component flooring system made by combining an epoxy resin with a chemical hardener. When these two components are mixed and applied to a properly prepared concrete surface, they undergo a chemical reaction that produces an extremely hard, dense, and seamless surface layer that bonds directly to the concrete substrate.
Unlike standard floor paint, which simply sits on top of the concrete and peels over time, epoxy penetrates the pores of the concrete and forms a molecular bond that is far stronger and more durable. The result is a surface that resists oil, chemicals, abrasion, impact, and moisture — all of the things a garage floor faces every single day.
Epoxy garage floor coating is available in a wide range of colors, finishes, and decorative styles. From simple solid-color coatings to dramatic metallic effects and multi-colored flake systems, there is an epoxy solution for every garage and every homeowner’s taste.
If you want to explore the full range of flooring options available for your home and garage, visit the Rio Epoxy Flooring services page for a complete overview of what is available in the Austin area.
Why Epoxy Garage Floor Coating Is Worth Every Dollar
Homeowners who invest in epoxy garage floor coating consistently describe it as one of the best decisions they have made for their property. Here is a detailed look at why this coating system delivers such strong value.
Exceptional Durability Under Real-World Conditions
A properly installed epoxy garage floor coating can withstand everything a working garage throws at it. Vehicle traffic, dropped tools, chemical spills, tire marks, and heavy equipment — none of these cause the kind of damage they would on bare concrete or standard paint. The hardened epoxy surface resists impact and abrasion at a level that no other residential floor coating can match at a comparable price point.
Chemical and Stain Resistance That Protects Your Investment
Oil, gasoline, brake fluid, antifreeze, and household chemicals are no match for a cured epoxy surface. These substances sit on top of the coating rather than soaking into the concrete, making cleanup as simple as wiping with a cloth or mopping with warm water. For homeowners who use their garage as a workshop or for vehicle maintenance, this benefit alone justifies the investment.
A Cleaner, Brighter Garage Environment
Bare concrete is porous and constantly sheds dust, which settles on vehicles, tools, and storage items. Epoxy garage floor coating seals the concrete completely, eliminating concrete dust and making the entire space dramatically easier to keep clean. The high-gloss finish also reflects light, making the garage feel brighter and more functional — especially valuable in garages used as workshops or home gyms.
Significant Increase in Home Value
A finished garage with a professional epoxy coating is a genuine selling point in the Austin real estate market. Buyers notice the difference immediately, and a clean, well-maintained garage signals that the entire property has been cared for. Real estate professionals consistently list updated garages among the features that support higher asking prices and faster sales.
Long Service Life With Minimal Maintenance
When installed correctly on a properly prepared surface, an epoxy garage floor coating lasts 10 to 20 years in residential settings. Compare that to standard garage floor paint, which typically begins peeling within 1 to 3 years, and the value proposition becomes clear. Maintenance requires nothing more than regular sweeping and occasional mopping.
For homeowners in communities like Lakeway, Leander, and Round Rock, Rio Epoxy Flooring delivers all of these benefits with the professionalism and attention to detail that local homeowners have come to expect.
Types of Epoxy Garage Floor Coating: Which System Is Right for You?
Choosing the right type of epoxy garage floor coating is essential to getting results that match your expectations, your budget, and the specific demands of your garage. Here is a breakdown of the most popular systems used in residential garages today.
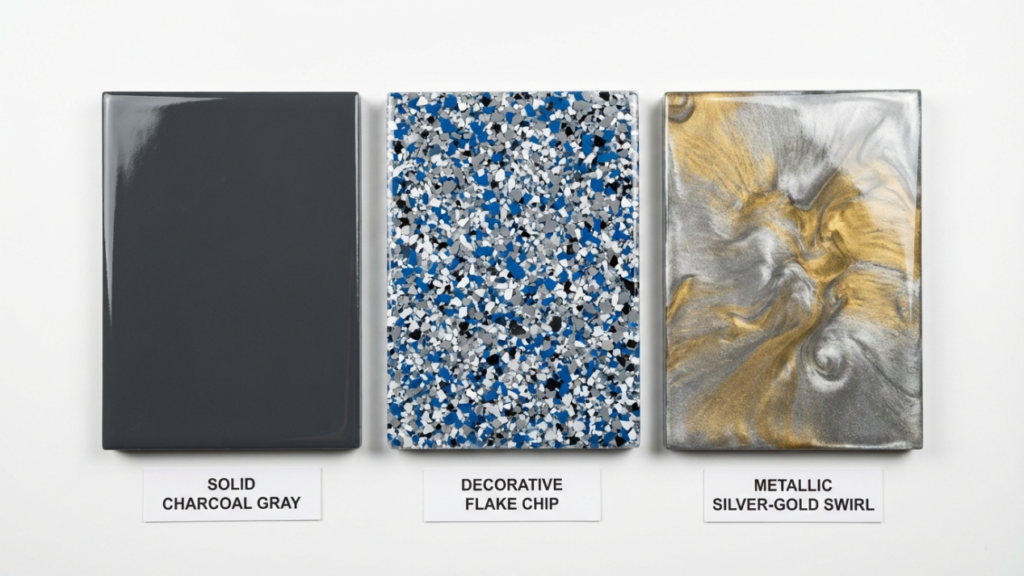
Solid Color Epoxy Coating
This is the most straightforward and cost-effective option. A single color — typically gray, tan, beige, or white — is applied in one or two coats over a prepared concrete surface. Solid color coatings deliver a clean, professional look and are ideal for homeowners who want a significant upgrade without the complexity or cost of a decorative system.
Decorative Flake (Chip) Epoxy System
This is the most popular epoxy garage floor coating system for residential use. Vinyl flakes or chips in a variety of colors and sizes are broadcast into a wet epoxy base coat, then sealed with a clear protective topcoat. The result is a textured, multi-colored surface that hides dirt and minor imperfections well, provides excellent slip resistance, and looks genuinely impressive. This system is the go-to choice for homeowners who want both performance and visual appeal.
Metallic Epoxy Coating
Metallic epoxy uses special pigments that create a three-dimensional, flowing effect resembling polished stone, molten metal, or ocean waves. No two metallic floors look exactly alike, which makes this option popular for homeowners who want a truly unique garage floor. Metallic epoxy is more expensive than flake or solid systems but delivers a level of visual drama that is unmatched by any other coating option.
Polyaspartic and Polyurea Topcoat Systems
Many professional installers, including Rio Epoxy Flooring, use hybrid systems that combine an epoxy base coat with a polyaspartic or polyurea topcoat. Polyaspartic topcoats cure faster, offer superior UV stability (preventing yellowing), and provide excellent scratch and chemical resistance. This combination gives homeowners the best of both technologies — the adhesion and build of epoxy with the durability and UV resistance of polyaspartic.
Water-Based vs. 100% Solids Epoxy
Water-based epoxy products are commonly found in big-box store DIY kits. They are easier to apply but contain significantly less epoxy solids, resulting in a thinner, weaker coating that typically fails within a few years. Professional-grade 100% solids epoxy contains no solvents or water — every component of the mixed product becomes part of the finished coating, resulting in a much thicker, harder, and more durable surface.
Comparison Table: Epoxy Garage Floor Coating Types
| System Type | Best For | Durability | Cost Range (per sq ft) | Visual Appeal | UV Stability |
|---|---|---|---|---|---|
| Solid Color Epoxy | Budget upgrades, utility garages | High | $3 – $5 | Clean, professional | Moderate |
| Decorative Flake System | Most residential garages | Very High | $4 – $7 | Textured, multi-color | Good |
| Metallic Epoxy | Showroom-style garages | Very High | $7 – $12 | Dramatic, unique | Good |
| Polyaspartic Hybrid | High-performance applications | Excellent | $6 – $10 | Smooth or textured | Excellent |
| Water-Based (DIY) | Temporary budget solution | Low | $1 – $3 | Basic | Poor |
How Much Does Epoxy Garage Floor Coating Cost in Austin, TX?
Cost is the question most homeowners ask first, and it deserves a thorough, honest answer. The price of epoxy garage floor coating depends on several factors: the size of the garage, the type of system chosen, the condition of the existing concrete, and the level of surface preparation required.
Average Cost by Garage Size
One-Car Garage (approximately 200–250 sq ft):
- Basic solid color system: $600 – $1,250
- Decorative flake system: $800 – $1,750
- Metallic or polyaspartic system: $1,400 – $3,000
Two-Car Garage (approximately 400–500 sq ft):
- Basic solid color system: $1,200 – $2,500
- Decorative flake system: $1,600 – $3,500
- Metallic or polyaspartic system: $2,800 – $6,000
Three-Car Garage (approximately 600–750 sq ft):
- Basic solid color system: $1,800 – $3,750
- Decorative flake system: $2,400 – $5,250
- Metallic or polyaspartic system: $4,200 – $9,000
What Affects the Final Price?
Several factors can increase or decrease the cost of your epoxy garage floor coating project:
- Concrete condition: Cracks, spalling, previous coatings, and moisture issues require additional preparation work, which adds to the cost.
- Surface preparation method: Diamond grinding produces a better surface profile than acid etching and is the preferred method for professional installations, but it requires specialized equipment.
- Number of coats: A primer coat, base coat, decorative layer, and two topcoat layers produce a more durable result than a single-coat system but cost more.
- Decorative complexity: Metallic and custom flake systems require more skill and time than solid color applications.
- Geographic location: Labor costs in Austin and the surrounding Central Texas area reflect local market rates.
DIY vs. Professional Installation: The Real Cost Comparison
A DIY epoxy kit from a home improvement store costs $100 to $300 for a two-car garage. On the surface, this seems like a significant savings. However, DIY kits use water-based formulas with low solids content that rarely last more than 1 to 3 years before peeling. When you factor in the cost of materials, tools, your time, and the eventual cost of removing the failed coating and starting over, professional installation is almost always the better financial decision.
Rio Epoxy Flooring offers flexible financing options to help Austin homeowners get a professional epoxy garage floor coating without financial stress. Spreading the investment over manageable monthly payments makes a high-quality installation accessible for virtually any budget.
Step-by-Step: How Professional Epoxy Garage Floor Coating Is Installed
Understanding the installation process helps you evaluate contractor quality and set realistic expectations for your project. Here is exactly how a professional epoxy garage floor coating installation works.
Step 1: Initial Assessment and Moisture Testing
Before any product is applied, a professional installer evaluates the concrete for existing coatings, cracks, moisture levels, and surface profile. A moisture vapor emission test is performed using a calcium chloride kit or relative humidity probe. If moisture levels exceed acceptable thresholds, a moisture-mitigating primer must be used to prevent delamination.
Step 2: Mechanical Surface Preparation
This is the most critical step in the entire process. The concrete surface must be mechanically ground using diamond grinding equipment to open the pores of the concrete and create a surface profile (measured in CSP — Concrete Surface Profile) that allows the epoxy to bond properly. Any cracks, divots, or spalled areas are repaired with epoxy filler or patching compound. The surface is then vacuumed thoroughly to remove all dust and debris.
Skipping or inadequately performing this step is the primary cause of epoxy garage floor coating failure. A reputable contractor will never cut corners here.
Step 3: Primer Application
A penetrating epoxy primer is applied to the prepared surface. The primer seals the concrete, prevents outgassing (air bubbles rising through the epoxy as the concrete off-gasses), and creates a strong chemical foundation for the subsequent coats.
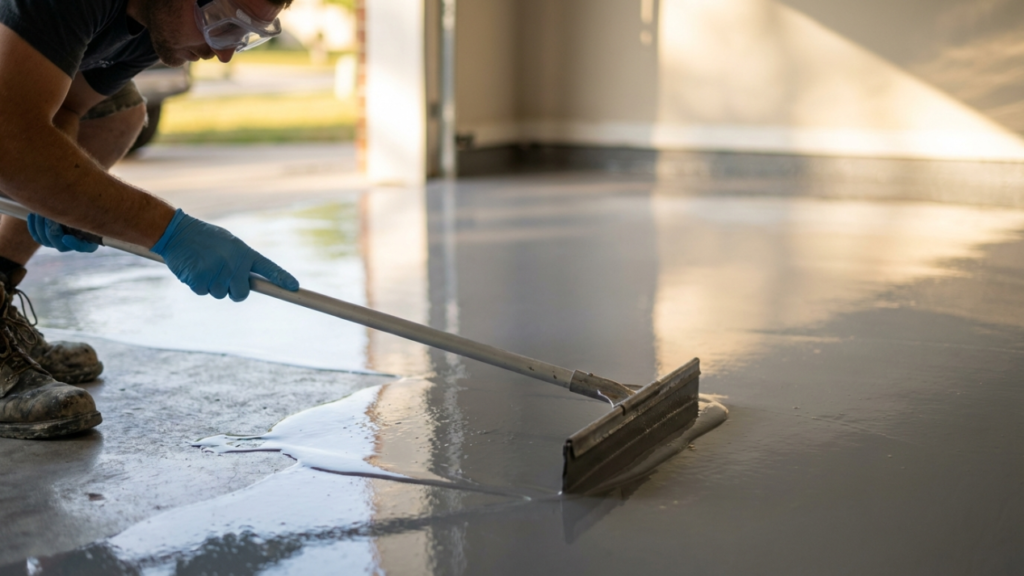
Step 4: Base Coat Application
The epoxy base coat is applied using rollers and squeegees. For solid color systems, this may be the primary visible layer. For flake systems, the base coat is typically a solid color that complements the chosen flake blend. The base coat is allowed to cure for the specified time — typically 8 to 24 hours — before the next layer is applied.
Step 5: Decorative Layer Application
For flake systems, vinyl chips are broadcast by hand across the wet base coat until the desired coverage density is achieved. For metallic systems, metallic pigments are manipulated with tools, rollers, and air to create the desired swirling, flowing effect. Excess flakes are swept up and saved for future repairs.
Step 6: Topcoat Application
A clear polyurethane, polyaspartic, or polyurea topcoat is applied over the cured base coat and decorative layer. This is the protective layer that provides UV stability, scratch resistance, chemical resistance, and the final gloss level. Most professional installations use two topcoat layers for maximum protection and longevity.
Step 7: Curing Period and Final Walkthrough
The completed floor is allowed to cure fully. Light foot traffic is typically safe after 24 hours. Vehicle traffic should be avoided for 72 hours. Full chemical cure takes approximately 7 days. A final walkthrough with the homeowner ensures the surface meets expectations and any questions about maintenance are addressed.
The team at Rio Epoxy Flooring follows this exact process on every garage project, ensuring consistent, professional results across Austin and all surrounding communities.
Thinking about upgrading your garage floor this season? Explore Rio Epoxy Flooring’s garage flooring solutions and see the full range of systems available. Call (737) 307-1888) or contact us online — Mon–Sat, 8am–5pm.
Real Austin Homeowners Share Their Epoxy Garage Floor Coating Experience
Nothing builds confidence like hearing from real customers who have been through the process. Here are verified reviews from homeowners who chose Rio Epoxy Flooring for their garage projects:
“I had been putting off doing my garage floor for years because I thought it would be too expensive and too disruptive. Rio Epoxy Flooring made the whole process easy. They were in and out in one day, the floor looks incredible, and I wish I had done it sooner.” — Kevin M., Austin, TX (Google Review)
“The flake system they installed in my three-car garage is absolutely beautiful. The crew was professional, the prep work was thorough, and the finished product exceeded my expectations. I have had multiple neighbors ask me who did the work.” — Sandra P., Georgetown, TX (Google Review)
“Fair pricing, excellent communication, and the quality of the work is outstanding. My garage floor has been in for two years now and it still looks brand new. Zero peeling, zero issues. Highly recommend Rio Epoxy Flooring to anyone in the Austin area.” — Robert H., Dripping Springs, TX (Yelp Review)
You can read more verified reviews on Rio Epoxy Flooring’s Yelp page or find the company on Google Maps to see the full rating and review history.
Rio Epoxy Flooring serves homeowners throughout the greater Austin area, including Georgetown, Dripping Springs, West Lake Hills, Rollingwood, Killeen, Temple, Barton Creek, Sunset Valley, Lost Creek, and Kempner. View the complete areas served page to confirm availability in your neighborhood.
Common Mistakes That Ruin Epoxy Garage Floor Coating Projects
Understanding what goes wrong on failed epoxy projects is just as valuable as knowing what goes right. These are the most frequent errors that lead to peeling, bubbling, and premature failure.
Inadequate Surface Preparation
This is the number one cause of epoxy garage floor coating failure, and it is almost always the result of cutting corners on preparation. Applying epoxy over a smooth, contaminated, or moisture-compromised surface will result in delamination within months. Professional mechanical grinding is not optional — it is the foundation of every successful installation.
Applying Epoxy Over a Damp or Wet Slab
Concrete slabs, especially in Texas where ground moisture levels can be significant, often emit moisture vapor that destroys epoxy adhesion from below. A moisture vapor emission test must be performed before any coating is applied. If moisture levels are too high, a moisture-mitigating primer is required. Skipping this test is a gamble that frequently results in a failed floor.
Using Big-Box Store DIY Kits on a Working Garage
Water-based epoxy kits from home improvement stores are not formulated for the demands of a working garage. They are thin, low-solids products that look acceptable for a short time and then begin to peel under vehicle traffic and chemical exposure. If you want a floor that lasts, professional-grade 100% solids epoxy is the only appropriate choice.
Applying Epoxy in Unfavorable Temperature or Humidity Conditions
Epoxy is a chemical system that requires specific conditions to cure properly. Applying epoxy when the concrete temperature is below 50°F or above 90°F, or when relative humidity is above 85%, will compromise the chemical reaction and the final bond. Professional installers monitor conditions carefully and schedule work accordingly — particularly important in Austin’s hot summers and variable spring weather.
Choosing the Wrong System for the Application
Not every epoxy system is appropriate for every garage. A homeowner who parks heavy trucks or uses the garage as a commercial workshop needs a more robust system than someone who parks a single passenger vehicle. Matching the system specification to the actual demands of the space is essential for long-term performance.
Returning to Service Too Soon
Driving a vehicle onto a freshly coated floor before it has fully cured is a common mistake that causes permanent tire marks and surface damage. Always follow the contractor’s recommended cure times — typically 72 hours for vehicle traffic and 7 days for full chemical cure.
How to Maintain Your Epoxy Garage Floor Coating
Proper maintenance is simple and takes very little time. Following these guidelines will keep your epoxy garage floor coating performing and looking its best for 15 to 20 years.
Routine Maintenance (Weekly or As Needed):
- Sweep or dust mop to remove grit, sand, and debris that can cause micro-scratches
- Mop with warm water and a pH-neutral cleaner for general cleaning
- Wipe up oil, chemical, or fluid spills promptly to prevent staining
- Use a soft-bristle broom rather than stiff brushes that can dull the finish
Periodic Maintenance (Monthly or Seasonally):
- Inspect the floor for any areas of wear, especially near entry points and under vehicle tires
- Clean tire marks with a diluted degreaser and a soft mop
- Check the perimeter and expansion joints for any signs of moisture intrusion
Long-Term Care (Annual or Every Few Years):
- Inspect the topcoat for signs of wear in high-traffic zones
- Consider a fresh topcoat application every 7 to 10 years depending on traffic levels
- Avoid dragging heavy, sharp objects across the surface
- Place rubber mats under vehicle parking spots if you want additional protection in high-wear areas
What to Avoid:
- Harsh chemical cleaners, bleach, or ammonia-based products that can degrade the topcoat
- Steam mops, which can soften the coating over time
- Prolonged standing water near floor drains or entry points
Epoxy Garage Floor Coating vs. Other Garage Flooring Options
Homeowners often compare epoxy to other garage flooring solutions before making a decision. Here is an honest comparison of the most popular options.
| Feature | Epoxy Coating | Garage Floor Paint | Interlocking Tiles | Polyurea Coating | Bare Concrete |
|---|---|---|---|---|---|
| Durability | Excellent | Poor | Good | Excellent | Moderate |
| Chemical Resistance | Excellent | Poor | Moderate | Excellent | Poor |
| Maintenance | Very Easy | Moderate | Easy | Very Easy | Difficult |
| Installation Cost | Moderate | Low | Moderate | High | None |
| Lifespan | 10–20 years | 1–3 years | 5–15 years | 15–25 years | Indefinite (degrades) |
| Customization | Very High | Low | Moderate | Moderate | None |
| Slip Resistance | Adjustable | Low | Good | Adjustable | Low |
| Professional Required | Recommended | No | No | Yes | N/A |
People Also Ask: Common Questions About Epoxy Garage Floor Coating
People Also Ask (PAA) questions identified for this topic:
- How long does epoxy garage floor coating last?
- Is epoxy garage floor coating worth it?
- What is the best epoxy for a garage floor?
- How do I prepare my garage floor for epoxy coating?
- Can you epoxy coat a garage floor yourself?
Frequently Asked Questions About Epoxy Garage Floor Coating
How long does epoxy garage floor coating last?
A professionally installed epoxy garage floor coating on a properly prepared surface typically lasts 10 to 20 years in residential settings. Longevity depends on the quality of the installation, the type of system used, traffic levels, and maintenance practices. Topcoat refreshes every 7 to 10 years can extend the life of the system significantly. Visit the Rio Epoxy Flooring FAQ page for more detailed answers.
Is epoxy garage floor coating worth the investment?
Yes, for most homeowners the investment is well justified. Epoxy garage floor coating delivers 10 to 20 years of low-maintenance performance, dramatically improves the appearance and functionality of the garage, and adds measurable value to the property. When compared to the cost of repeatedly replacing failed paint or dealing with deteriorating concrete, professional epoxy is the more economical long-term choice.
Can I apply epoxy garage floor coating myself?
DIY epoxy application is possible but rarely delivers professional results. The most critical step — mechanical surface preparation — requires specialized diamond grinding equipment that most homeowners do not have access to. Without proper preparation, even high-quality epoxy products will fail prematurely. For a floor that lasts and looks professional, hiring an experienced installer is strongly recommended.
How long does it take to install epoxy garage floor coating?
Most residential garage epoxy projects are completed in one to two days. Surface preparation, primer, base coat, decorative layer, and topcoat are typically applied within a single day for a standard two-car garage. The floor is ready for light foot traffic within 24 hours and vehicle traffic within 72 hours. Full chemical cure takes approximately 7 days.
Does epoxy garage floor coating work in Texas heat?
Yes, when the right products and installation practices are used. Texas summers present challenges — high temperatures and humidity can affect epoxy cure times and application windows. Professional installers in Austin schedule work during cooler morning hours and use products formulated for high-temperature environments. A polyaspartic or polyurea topcoat is particularly well-suited to Texas conditions because of its superior UV and heat resistance.
Why Austin Homeowners Choose Rio Epoxy Flooring for Their Garage Projects
Rio Epoxy Flooring is a locally owned and operated flooring company based in Austin, TX, serving homeowners and businesses throughout Central Texas. The company has earned its reputation through consistent craftsmanship, transparent pricing, and a genuine commitment to customer satisfaction on every project.
Located near the heart of Austin at 823 Congress Ave., Austin, TX 78701 — just minutes from landmarks like Barton Springs Pool and the South Congress corridor — Rio Epoxy Flooring is deeply embedded in the local community it serves. The team understands the specific challenges that Central Texas conditions present for concrete coatings, from the region’s clay-heavy soils that cause slab movement to the intense summer heat that demands UV-stable topcoat systems.
In addition to epoxy garage floor coating, Rio Epoxy Flooring offers residential epoxy flooring solutions, commercial epoxy flooring in Austin, custom countertops, and pool resurfacing — making it a comprehensive solution for homeowners who want consistent, high-quality finishes throughout their entire property.
Follow Rio Epoxy Flooring on LinkedIn and watch real project videos on their YouTube channel to see the quality of work firsthand before making any decisions.
You can reach the Rio Epoxy Flooring team at (737) 307-1888 or by email at contact@rioepoxyflooring.
Transform Your Garage With a Professional Epoxy Garage Floor Coating
Your garage floor does not have to be an eyesore. With a professionally installed epoxy garage floor coating, you can transform a stained, cracked, and neglected concrete slab into a surface that is beautiful, durable, easy to maintain, and genuinely adds value to your home.
Throughout this guide, you have learned what epoxy garage floor coating is, the different types available and how they compare, what the real costs look like for Austin homeowners, how the installation process works from start to finish, what mistakes to avoid, and how to maintain your floor for maximum longevity.
The next step is straightforward: get a professional assessment of your garage floor and find out exactly what epoxy can do for your space.
Ready to transform your garage floor? Contact Rio Epoxy Flooring today for your free, no-obligation quote. Call (737) 307-1888, email contact@rioepoxyflooring.
Local Service Areas
Rio Epoxy Flooring proudly serves homeowners throughout Central Texas, including Austin, Round Rock, Georgetown, Leander, Lakeway, Dripping Springs, West Lake Hills, Rollingwood, Barton Creek, Sunset Valley, Lost Creek, Killeen, Temple, and Kempner. View all areas served.
Business Information: Rio Epoxy Flooring 823 Congress Ave., Austin, TX 78701 Phone: (737) 307-1888 Email: contact@rioepoxyflooring.