

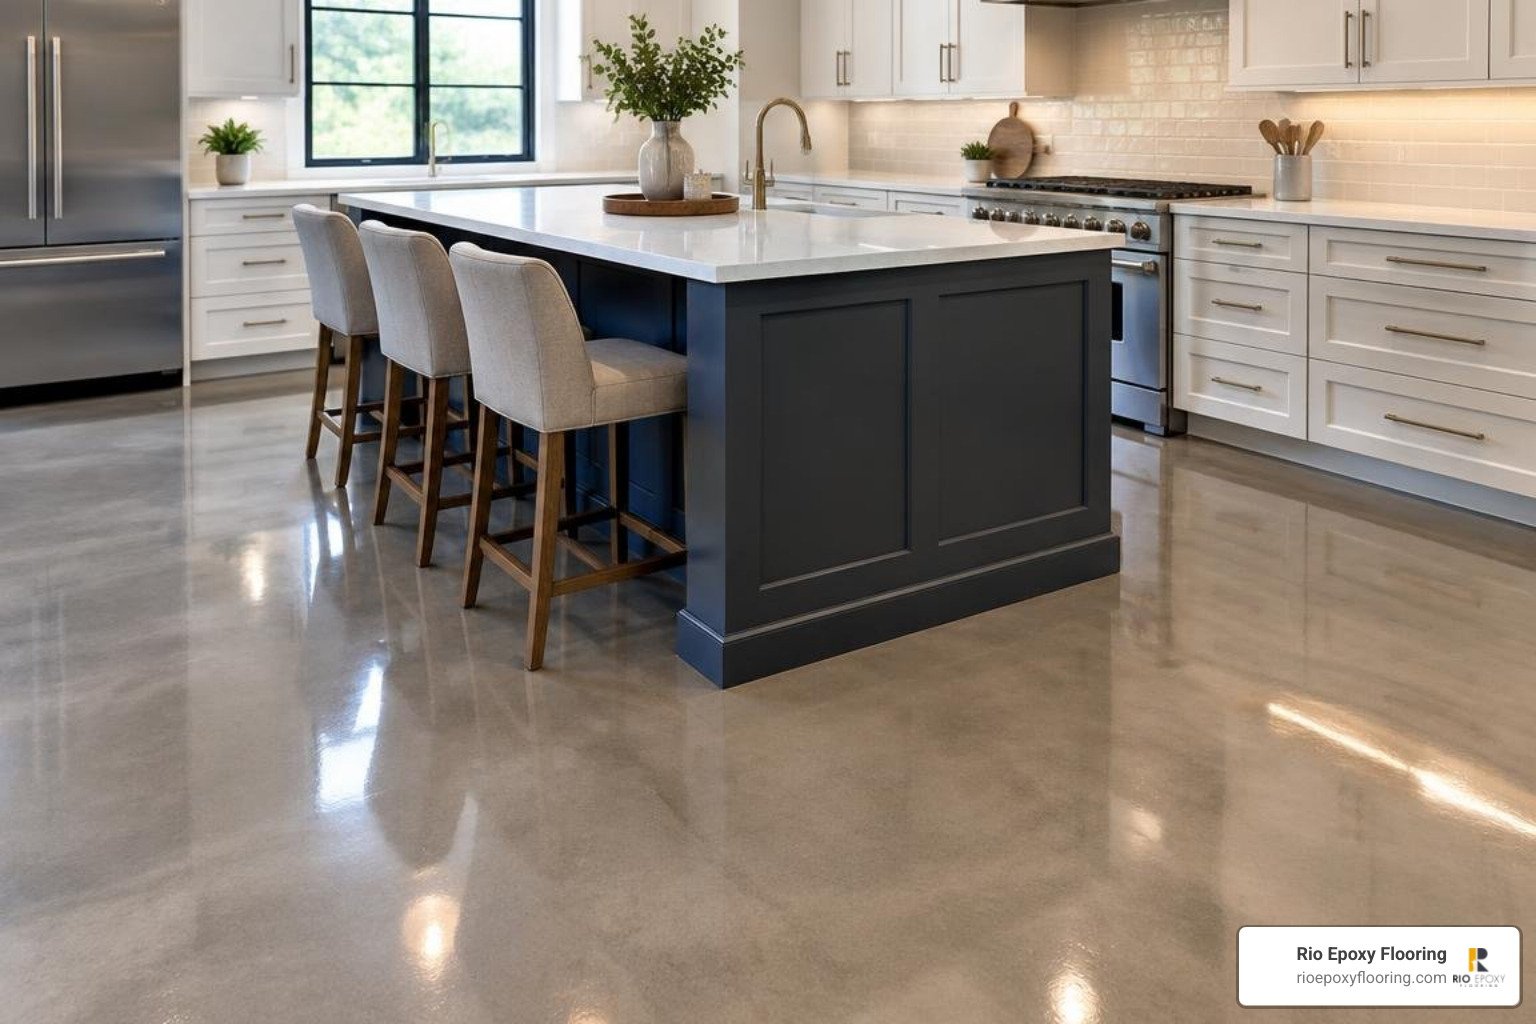
How to Apply Kitchen Floor Epoxy Around a Fixed Island
To install kitchen floor epoxy around island cabinetry, keep the island in place, then prepare the exposed floor with careful edge grinding, repairs, and moisture testing. Mask the toe-kick, apply the manufacturer-approved primer, basecoat, and protective topcoat, and use a slip-resistant additive where water or food spills are likely.
The result can be a seamless, stain-resistant surface with no grout lines to trap dirt. But the coating is only as reliable as the subfloor beneath it. Concrete is the preferred base; wood, tile, and vinyl may need removal, leveling, or a compatible underlayment because movement and trapped moisture can cause epoxy to crack or lose adhesion.
Around an island, the details matter most: clean edges, a planned expansion gap where needed, and a textured topcoat that gives secure footing without making daily cleaning difficult. For a broader look at how resinous systems perform in home settings, see this overview of epoxy flooring.
I am Roger Aguiar, an Austin-based entrepreneur and digital marketing professional with more than seven years of experience helping small and mid-sized businesses explain specialized services clearly. My work on topics such as kitchen floor epoxy around island installations focuses on helping homeowners understand the practical choices that affect safety, cost, and long-term value.
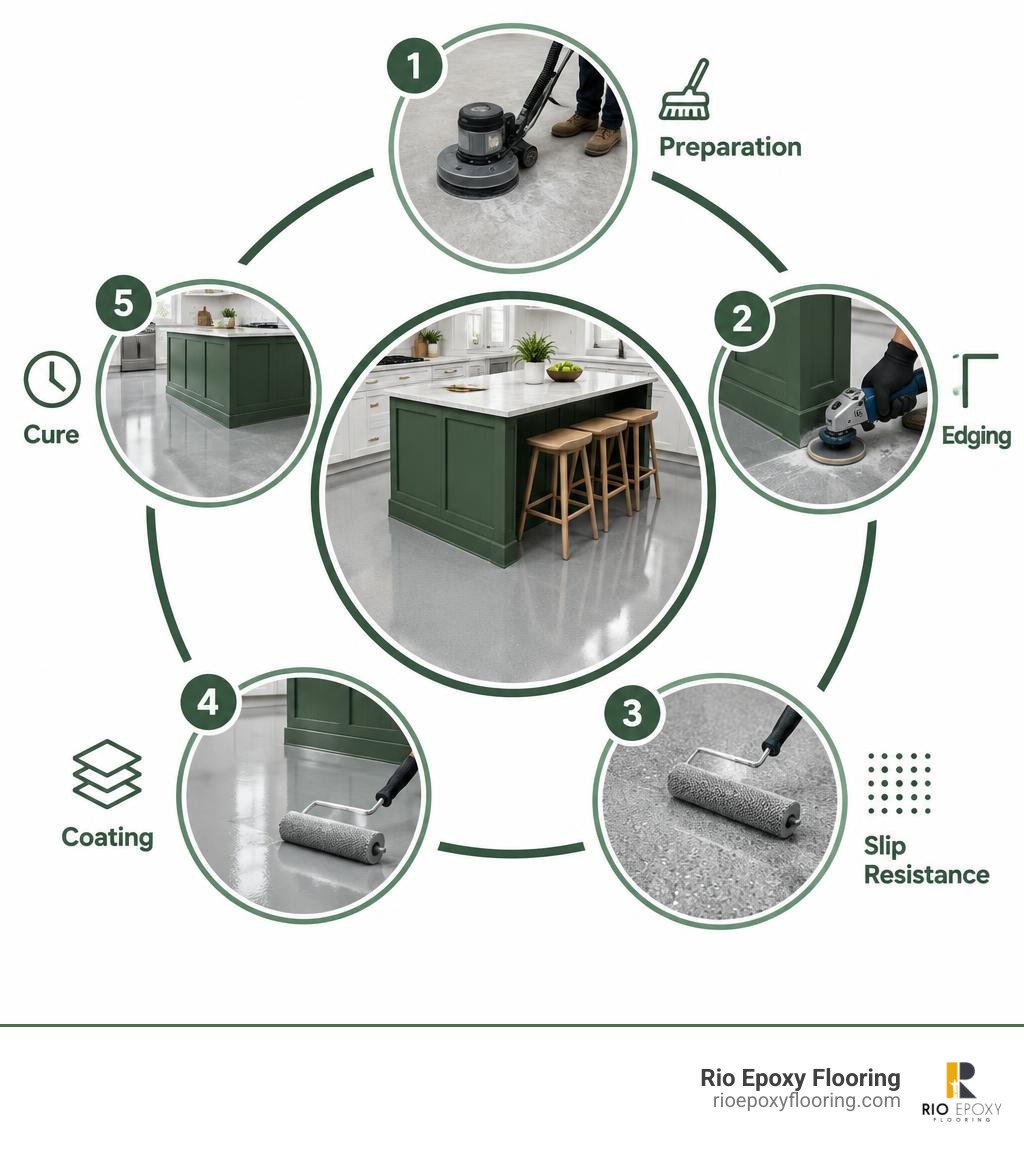
Related content about kitchen floor epoxy around island:
Benefits and Performance of Kitchen Island Epoxy Coatings
The kitchen island is the beating heart of the modern home. It serves as a prep station, breakfast bar, homework hub, and late-night gathering spot. Because foot traffic concentrates around this central feature, standard flooring options often wear down prematurely. Grout lines between tiles collect grease, luxury vinyl planks can scuff under shifted barstools, and hardwood finishes wear thin near the sink.
Applying custom residential epoxy flooring solutions creates a high-performance, monolithic surface that completely eliminates these vulnerabilities. Epoxy creates an impervious barrier that resists impact from dropped cast-iron skillets, rolling kitchen carts, and constant footwork.
Unlike modular flooring systems, a properly installed resinous floor has zero grout lines, seams, or open expansion joints where liquid spills can penetrate. Whether you are dealing with hot cooking oil splatters, red wine, or vinegar, cured epoxy prevents staining and allows quick, effortless cleanup without leaving behind foul odors or deep stains.
Seamless Hygiene and Moisture Defense
In standard kitchen layouts, moisture naturally collects around the island perimeter, particularly if your island houses a prep sink or dishwasher. Traditional flooring materials allow moisture to seep into subfloors through seams or microscopic grout pores, fostering hidden mold and mildew colonies.
A seamless resinous surface acts as a continuous moisture barrier across the entire slab. By pairing high-grade resin with an impenetrable topcoat, liquid stays on the surface for simple wiping. Furthermore, modern installations leverage low-VOC epoxy flooring benefits, ensuring that your indoor air quality remains clean and safe for your family throughout the installation and curing cycle. Once cured, the finish is chemically inert, non-porous, and certified food-safe, preventing bacteria from nesting near your meal preparation stations.
Epoxy Design and Finish Options
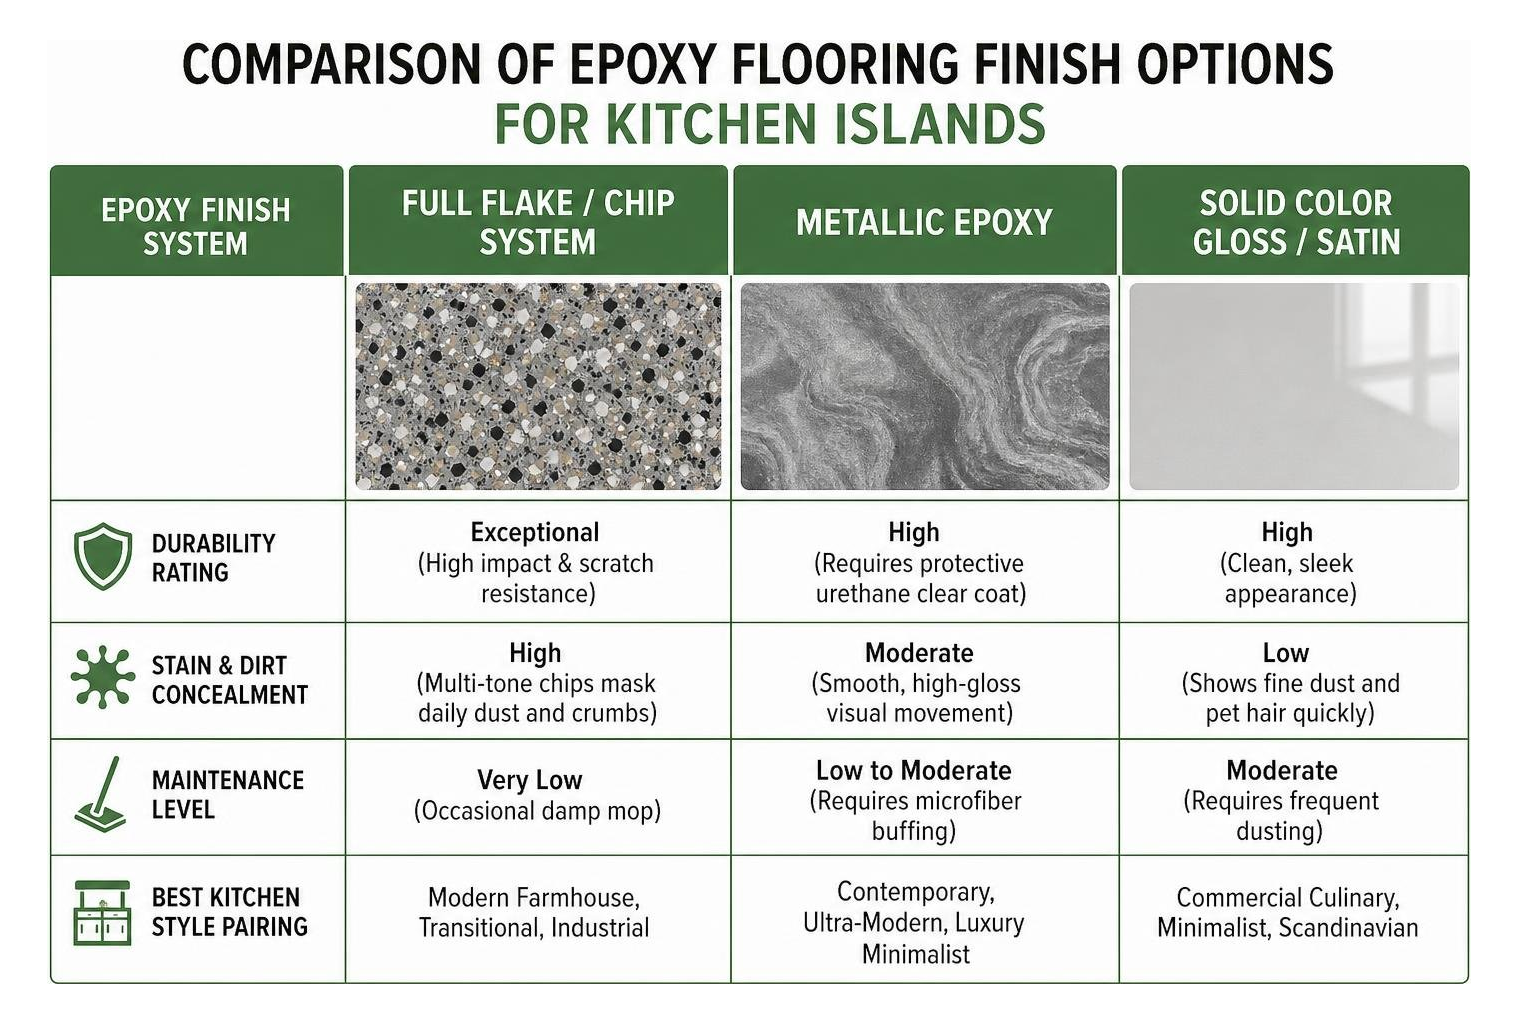
Epoxy allows for complete design customization to match your kitchen cabinetry, countertops, and lighting. The table below illustrates how primary epoxy systems perform around high-traffic kitchen islands:
| Epoxy Finish System | Durability Rating | Stain & Dirt Concealment | Maintenance Level | Best Kitchen Style Pairing |
|---|---|---|---|---|
| Full Flake / Chip System | Exceptional (High impact & scratch resistance) | High (Multi-tone chips mask daily dust and crumbs) | Very Low (Occasional damp mop) | Modern Farmhouse, Transitional, Industrial |
| Metallic Epoxy | High (Requires protective urethane clear coat) | Moderate (Smooth, high-gloss visual movement) | Low to Moderate (Requires microfiber buffing) | Contemporary, Ultra-Modern, Luxury Minimalist |
| Solid Color Gloss / Satin | High (Clean, sleek appearance) | Low (Shows fine dust and pet hair quickly) | Moderate (Requires frequent dusting) | Commercial Culinary, Minimalist, Scandinavian |
Planning Your Kitchen Floor Epoxy Around Island Layouts
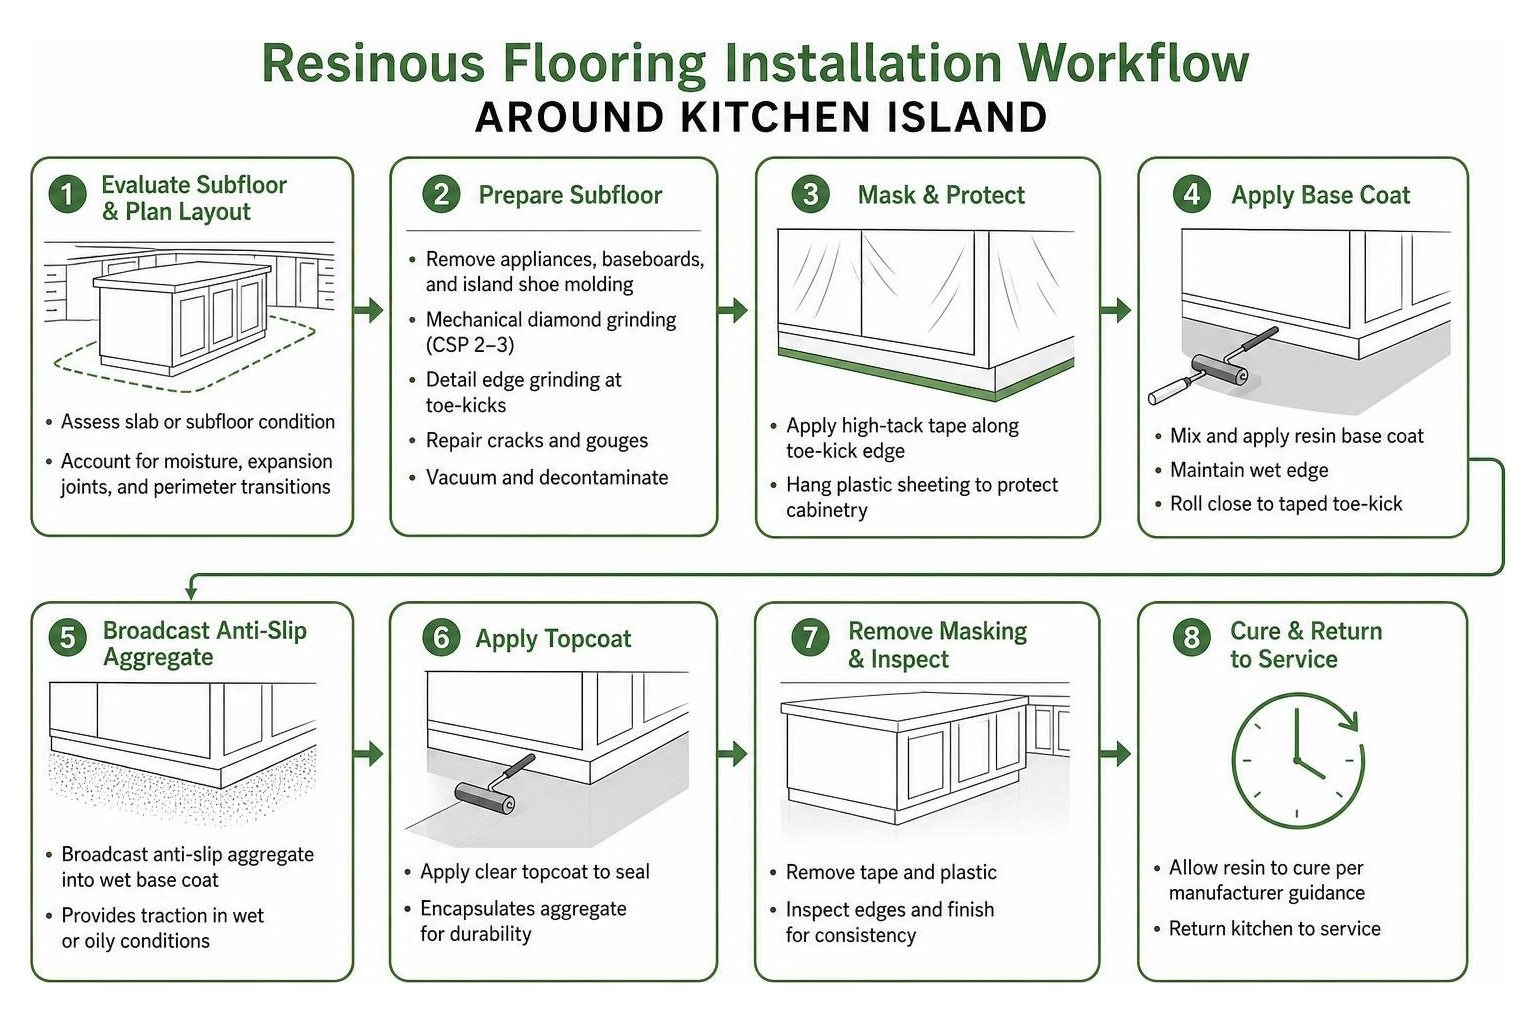
Applying a seamless coating around a fixed kitchen island requires calculated layout planning. Because kitchen islands are permanently fastened to the subfloor or floor framing, the coating must terminate cleanly against the cabinet toe-kicks, end panels, or decorative molding.
Before starting, the subfloor must be thoroughly evaluated. Concrete slabs are the gold standard for epoxy systems. If your home has a plywood or OSB subfloor, standard rigid epoxy cannot be applied directly over the wood due to seasonal deflection and moisture movement. In such cases, an uncoupling cementitious underlayment or specialized flexible epoxy membrane must be applied first.
Following an established epoxy flooring installation guide ensures you properly account for concrete moisture vapor emission rates (MVER), structural expansion joints, and tight perimeter transitions.
Subfloor Preparation for Kitchen Floor Epoxy Around Island Cabinets
Preparation represents 80% of any successful epoxy project. Without proper mechanical profiling, the resin cannot develop a mechanical bond with the concrete, leading to peeling, blistering, or delamination near high-stress cabinet transitions.
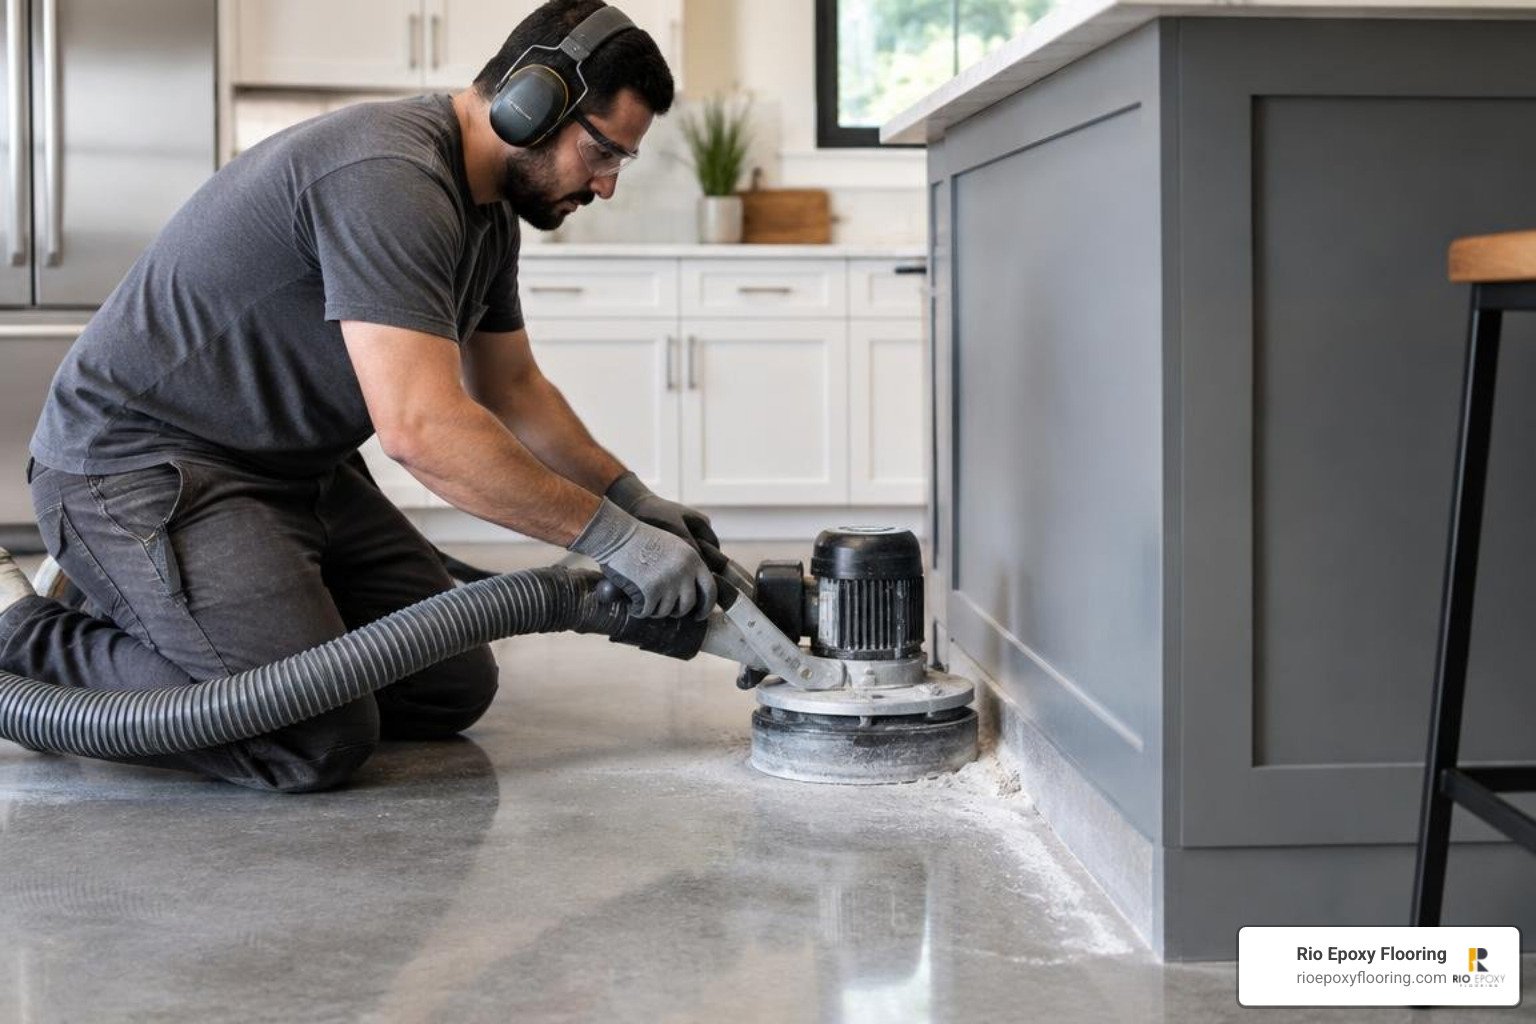
- Appliance & Baseboard Removal: Remove the refrigerator, freestanding range, and baseboard trim around perimeter walls. For the fixed island, remove the decorative shoe molding or base trim along the toe-kick.
- Mechanical Diamond Grinding: The large open areas of the kitchen require a planetary diamond floor grinder connected to a HEPA dust extractor. This opens the concrete pores and establishes an ideal Concrete Surface Profile (CSP 2 to CSP 3).
- Detail Edge Grinding: Large grinders cannot reach flush against the fixed island toe-kick. Use a 7-inch hand-held diamond grinder with a vacuum shroud to grind right up to the cabinet edge without gouging the wood.
- Substrate Repair: Fill all cracks, pinholes, and gouges with high-strength epoxy patch or polyurea crack filler. Sand these repairs flush with the profiled floor slab.
- Decontamination: Thoroughly vacuum the entire floor multiple times, followed by a denatured alcohol or acetone wipe-down to lift any remaining dust particles or grease.
Slip Resistance and Safety for Kitchen Floor Epoxy Around Island Workstations
Because high-gloss resin floors create a smooth, non-porous glass-like plane, moisture or cooking oils can make them slick underfoot. The natural question many homeowners have is: are epoxy floors slippery when wet?
The answer depends entirely on your chosen topcoat formulation. Around a fixed kitchen island where water splashes from sinks or grease splatters from cooktops are common, incorporating anti-slip aggregate into the clear topcoat is essential. Broadcast materials such as fine aluminum oxide, spherical glass beads, or textured polypropylene additives provide mechanical grip under shoe soles without feeling overly rough on bare feet. This creates an ergonomic, secure workspace for long culinary prep sessions.
Step-by-Step Installation Around Fixed Cabinetry
Installing resin around fixed obstacles demands strict adherence to material pot life, precise tape lines, and controlled environmental temperatures.
Masking, Edging, and Detail Grinding
The toe-kick of your kitchen island sits low to the ground, making it easy to accidentally smear with resin or chip with diamond grinding tools.
- Apply high-tack, chemical-resistant masking tape along the exact bottom edge of the island’s vertical toe-kick boards.
- Hang protective plastic sheeting upward from the tape line to shield cabinetry faces from airborne flake fragments or accidental splatter.
- Check that the transition where the concrete meets the island framing is completely sealed. If a gap exists beneath the toe-kick, bridge it with an elastomeric or epoxy-based caulk to prevent uncured resin from draining beneath the cabinets.
Primer, Basecoat, and Flake Broadcasting
Once masking and vacuuming are complete, the multi-layer application begins:
- Penetrating Epoxy Primer: Mix a 100% solids, low-viscosity epoxy primer according to manufacturer part-A/part-B ratios. Cut in around the entire island perimeter using a stiff chip brush, ensuring full wet-out of the concrete pores. Roll out the field with a 3/8-inch nap roller.
- High-Solids Basecoat: After the primer cures tacky or dry-to-touch (typically 4 to 12 hours depending on ambient temperature), apply the pigmented basecoat. Cut the island perimeter first, then squeegee and back-roll the main floor.
- Flake Broadcast: If applying a decorative flake system, systematically toss vinyl flakes upward so they cascade evenly onto the wet basecoat. Work your way around the island, ensuring the boundary edges receive identical chip density as open walkways. When planning your design aesthetic, review helpful guidance on selecting flake blends for epoxy chip floors to complement your cabinetry finishes.
- Scraping and Recovery: Once the basecoat cures fully, use a flat steel floor scraper to knock down sharp flake edges across the floor, especially in the tight channel between the island and perimeter counters. Vacuum away all loose material.
Applying UV-Stable and Anti-Slip Topcoats
Kitchens often receive substantial natural sunlight from patio doors and large windows. Standard aromatic epoxy resins can yellow over time when exposed to ultraviolet radiation.
To ensure long-term color fastness and protection:
- Apply a high-performance, non-yellowing aliphatic polyurethane or polyaspartic clear coat.
- Mix in your chosen anti-slip texture aggregate thoroughly into the topcoat.
- Cut tightly against the island masking tape with a brush, then roll the topcoat in overlapping cross-hatch passes for uniform texture and sheen.
- Remove the toe-kick masking tape while the topcoat is still slightly wet to ensure a razor-sharp, clean edge without pulling cured resin away from the floor.
Cost Analysis, Longevity, and Routine Maintenance
A professionally installed kitchen epoxy floor typically ranges from $5 to $15 per square foot, depending on the complexity of the preparation work, subfloor repairs, and whether you select a solid, flake, or decorative metallic finish. While DIY kits may appear less expensive upfront, professional systems utilize 100% solids industrial-grade resins and commercial diamond grinding that ensure a 20- to 25-year service life.
Maintaining an epoxy floor around your island is straightforward compared to tile or wood:
- Daily Cleaning: Sweep or dry-dust with a soft microfiber mop to clear away loose crumbs and grit.
- Damp Mopping: Use warm water mixed with a pH-neutral cleaner. Avoid harsh acid-based cleaners, vinegar solutions, citrus strippers, or heavy soap concentrates, which can leave a cloudy film or degrade the protective topcoat.
- Heat Protection: While cured epoxy and urethane topcoats easily handle foot traffic and warm spills, never place blazing hot pans, cast-iron skillets, or deep-fryer baskets directly onto the floor.
- Long-Term Care: Applying basic, proper epoxy floor maintenance tips preserves the high-gloss luster and slip-resistant texture for decades.
Frequently Asked Questions About Kitchen Island Epoxy
Can epoxy be poured around an existing kitchen island without removing cabinets?
Yes. The overwhelming majority of residential kitchen epoxy projects take place around fixed islands and existing base cabinets. By utilizing precision hand grinding with HEPA shrouds, taping the toe-kicks, and using small trim brushes to cut in the basecoat and topcoat, installers achieve a seamless transition right to the cabinet edge. Reinstalling shoe molding or quarter-round trim over the cured floor produces a clean, factory-finished appearance.
Is epoxy flooring around kitchen islands safe for pets and food preparation?
Yes. Once fully cured (typically within 48 to 72 hours), professional-grade epoxy and polyaspartic coatings become inert, non-toxic, and emit zero volatile organic compounds (VOCs). The seamless, non-porous surface prevents food particles, spilled raw juices, and pet dander from penetrating the floor, making it one of the most hygienic flooring options available for home cooking environments.
How long before you can walk on kitchen floor epoxy around island work areas?
Most residential systems allow light foot traffic within 24 hours after the final clear topcoat is applied. However, heavy kitchen appliances, barstools, and full culinary activity should wait 48 to 72 hours. The floor reaches its complete chemical and mechanical cure in roughly 7 days, at which point it achieves maximum scratch, stain, and impact resistance.
Conclusion
Upgrading your kitchen floor with a seamless resin system brings commercial-grade durability, effortless maintenance, and stunning visual appeal directly into your home. By taking the time to detail the floor properly around fixed island cabinetry, profiling the concrete, and applying UV-stable, slip-resistant protective topcoats, you create a beautiful culinary space built to withstand the demands of daily life.
At Rio Epoxy Flooring, we specialize in fast 48-hour turnarounds, eco-friendly low-VOC formulations, and custom designs that elevate your kitchen. To see how a seamless resin system can revolutionize your space, explore professional high-performance epoxy flooring for commercial kitchens and residential spaces to schedule your design consultation.